DIY · Holidays

Whimsical Mason Jar Snow Globe DIY

Happy Holidays! I’m sharing this whimsical mason jar snow globe DIY. They are so beautiful in the light! I made quit a few and grouped them together around my home. Read on for details on how to make your own.

Supplies:


If you don’t happen to have any jars saved, you can find them at Michael’s craft store. The smaller ones are everyday value at $1.00 and the larger are $2.99 regular price. I found my smaller ones at Dollar Tree and I saved a few Atlas pasta sauce jars for the larger size.


Next you’ll need the mini trees. You can find a variety of these at the craft store in all kinds of colors and sizes. I picked a few shades of green for myself. Here are a few options from Michael’s. (mini 6 pack on the left/$2.99 and medium 3 pack on the right/$3.19)


Here are a few different options for the base. I always grab these when I find them on sale because I know I’ll be using them for different projects. (I don’t pay over a dollar or two for each.) I was lucky to find a few of the middle ones at Dollar Tree. I like to group the finished jars together so it looks great when you have different sizes and shapes. You can find these at most craft/home stores.


And of course, you’ll need snow and craft glue. All of these products can be found at your local craft store. I found my snow spray and filler at Dollar Tree and the craft glue at Michael’s. Be sure to grab the clear craft glue. I have seen it come in white and black. (Make sure to use industrial strength adhesive for your base, you don’t want your jar coming off the base.)


Instructions:

Hold your mason jar in one hand and with the other take your snow can and hold it about 4 to 5 inches above the opening. Spray a small short burst into the bottom of the jar to add some snow and texture to your jars. (This is a little messy and may get on your hand. Use gloves and wash if you get any on your skin.) Let sit for about and hour to dry.


Once dry, add about 1/4 jar of snow fill.

20161214_115553.jpg


Next, glue your tree down to the inside piece of the lid. (I used hot glue here to speed up the process.) Once it’s dry, place it in the jar and screw the lid on.


All you have to do now is put a little bit of craft glue around the rim of your base, center it on the lid, and let dry. Once it’s dry you can flip it right side up and start decorating!


These are on my kitchen hutch with my gingerbread tree. Don’t they look great!

20161214_120154


Thanks for reading, hope you enjoy this project!

~The Dimestore Gypsy

Recipes

My Family Dinner Favorites: Chicken Caldo (Mexican Style Chicken Soup)


My littles and I have all been under the weather this weekend due to this cold front that came in. The only thing we want to eat when we’re sick is chicken soup! It’s like magic..It just makes us feel better!

This recipe is filled with chicken and plenty of hearty veggies. The great thing is you just throw everything in the pot and let it cook!

Ingredients:

6 boneless, skinless chicken thighs

2 small zucchini

2 small yellow squash

3-4 small red potatoes

10-15 baby carrots

1 cup frozen corn

1 half head green cabbage

1 small bunch of cilantro

1 can low sodium chicken broth

1 chicken bouillon cube (I used Knorr brand)

cumin, garlic powder, salt & pepper

steamed white rice

*optional (lime wedges and hot sauce)


Directions:

First prep your chicken and veggies.

  1. Wash, then trim the tops and ends off of your zucchini and squash. Cut them into 3-4 pieces depending on the length. You want nice uniform chunks.
  2. Wash and cut your potatoes into halves.
  3. Next, cut your cabbage in half and then cut that half  into quarters. (I keep a little of the stem on to keep the large chunks intact.)
  4. With the cilantro, I just rip off a handful and run it under some water to get any dirt off.
  5. Trim any excess fat off of the chicken thighs.

To cook:

  1. Take a 6 qt. stock pot and fill it up about halfway. Add your chicken thighs, seasonings, and the bullion cube, then place it on high heat. (I used a sprinkle of salt, pepper, garlic powder, and ground cumin.)
  2. Next, add all your veggies with the cabbage and cilantro on top.
  3. Now add the can of chicken stock. You want enough liquid to cover most of the cabbage without overflowing when it’s boiling. Add more water if you need to.
  4. Bring to a boil stirring occasionally.
  5. Once it starts to boil, cook for about 10 min. or until the cabbage is soft.

To serve, I make sure to get a couple of pieces of chicken,and a mix of all the veggies in each bowl. Add a spoonful of rice to the top and your soup is good to go! For added flavor, try a dash of hot sauce and a squirt of a lime wedge. That’s our favorite way to eat ours!

I hope you enjoy this recipe and it makes you feel better when you’re not feeling well. What are some of your family faves when your feeling under? I’d love to hear about them! Leave me a message if you try this recipe or have any questions.

Thanks for reading,

~The Dimestore Gypsy


Recipes

My Family Dinner Favorites: Chicken and Rice Stuffed Bell Peppers

It’s finally starting to feel like Fall here in Texas! We have been having some cooler weather the last couple of days and I’m loving it. I made these stuffed bell peppers for dinner last night and they were a big hit so I thought I’d share with you.

While out at the grocery store, these huge, bright green bell peppers caught my eye and I just had to get some. They looked so fresh and I have been wanting to try stuffed bell peppers. I’ve never tried them before so I thought these would be perfect. All together, I believe this meal was under $10 for a family of 3-4.

Ingredients:

1 lb. ground chicken (I used Purdue from Kroger)

1 cup of any rice you’d like (I used Knorr rice sides in cheddar broccoli)

1 10.5 oz. can cream of chicken condensed soup

1/4 cup chicken broth

1-1.5 cup shredded mozzarella cheese for topping

3-4 bell peppers ( I used 3 for my family)

*optional (frozen steamed veggies)


Directions:

  1. Preheat your oven to 350 degrees.
  2. Cut the tops off of your bell peppers and remove the seeds/ribs carefully as to not damage the pepper. Rinse inside and out. Set aside. (Test to see if they stand straight up to act as a cup for your filling. If not, you can cut just a small slice off the bottom to help it stand flat.)
  3. Take a 3 qt. sauce pan and fill with water. Bring it to a boil and add your peppers for 2-3min to soften. Set aside when done.
  4. Next, cook your ground chicken. Be sure to season to taste. (I used a sprinkling of each: salt, pepper, garlic pepper, chili powder, and oregano) While browning the chicken, I used the microwave directions to cook my rice so it would be done at the same time as the chicken.
  5. Now add 1 cup of the cooked rice to your cooked chicken and mix.
  6. Add about 3/4 of the can of soup, add the chicken broth, and mix.
  7. Place your bell peppers standing up in an ungreased baking dish. (I used a small glass rectangular baking dish, but you can use whatever dish you prefer.) Add the filling to each bell pepper and really pack it in!
  8. Next I added a small spoonful of the leftover cream of chicken soup to each bell pepper.
  9. Top each with the shredded mozzarella and bake uncovered for 30 min.


I added a bag off Birds Eye Select steamed Brussel sprouts and our meal was complete!

20161111_183857.jpg

These peppers were so good and so filling! I hope you enjoy. Let me know how they turn out if you decide to make these.

Thanks for reading,

~The Dimestore Gypsy


Holidays

Cute & Inexpensive Halloween Party Game Prizes

Happy Wednesday! Just a few more days and Halloween will be here. A few days ago I shared some great Halloween party game ideas that I’ve used at our parties and now I have a few prize ideas to go along with them. I can recall the excitement and joy winning prizes at the Halloween carnivals I would go to as a child. Last year at our party, one of my son’s friends won a game of bingo and he was so excited. His prize was a ceramic Darth Vader vase full of Halloween salt water taffy I found at Target. (Yes, I love Target lol) Anyway, He said, “I never win anything.” Then after picking his prize he said, “Man, this is my favorite candy, thank you.” He was happy the whole night and it brought me back to when I was a kid.

All of these items are from Target but I do provide another option at the end you can put together yourself using items of your choice. I try to find cute gifts that aren’t expensive. After all, I like to have a lot of games so I keep that in mind when I’m shopping. If you wait to buy the week of the party, you can usually find everything on sale.

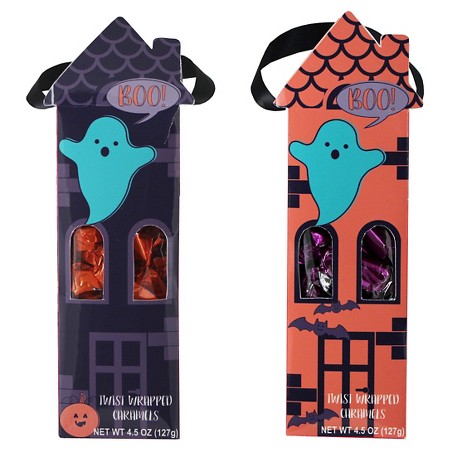
So the first thing I found are these boxed Halloween caramels. I just love the cute packaging! They come in these 2 colors and have a little ribbon handle at the top. They’re on sale for $2.49 right now.


51014478
Gallerie Halloween Twist Wrapped Caramels 4.5oz -$2.49


The next thing I want to share are these cute cookie pops. I mean, look at that Frankenstein…so cute! At $1.79ea., these are a fun option.


50915150
Candyville Halloween Cookie Pops 1.3oz -$1.79


I love this next idea! It’s a great alternative for the younger ones and a great family activity. This kit comes with pre-baked cookies and all the goodies to decorate them. All you have to do is open it up and let the kids get creative!

At my last party, my nephew (who was 5 yrs. old at the time) won a games so I gave him a Zombie Brain Rice Krispy Treat kit I had found at Target for around the same price point. He was able to help his parents make/decorate them and loved it. If you will have any children who are younger, a great idea is to have a pack of bubbles on hand to give out. This way they can participate as well.


50913499
Create a Treat Halloween Chocolate Skeleton Family Cookie Kit 13.4oz -$4.49


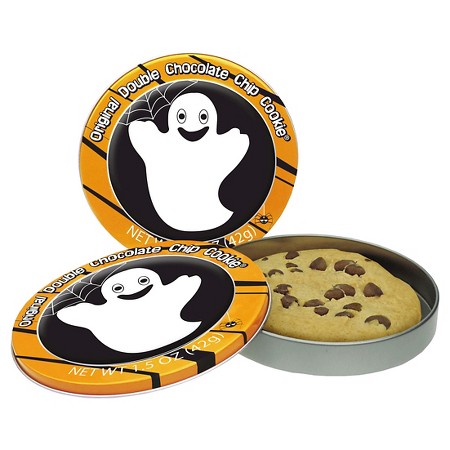
Another fun prize option are these gourmet chocolate chip cookie tins. These are single cookies about the size of your palm and come in a cute keepsake tin.


50909069
Original Gourmet Double Chocolate Chip Cookie 1.5oz -$1.00


50909069_alt03


I also found these Halloween wrapped chocolate bars you could use as a prize. There’s 4 different package styles and who doesn’t love chocolate right?


50972262
Bloomsberry Halloween Booing Chocolate Bars -$1.79


The next idea is a great option because the favors come in packs of 4-8 for $1.00. You can get multiple prizes for under $10.00! All of the items are from Target. The gift bags are on sale for .50 right now. Just put one of each favor in the bag, close it with a fun Halloween sticker and you have prize bags ready to hand out.

I also included a crazy skeleton tumbler. Instead of bags, you can put a few favors in the tumbler, put the lid back on, and you have a cute inexpensive prize ready. These tumblers and favors can be found at Dollar Tree and Dollar General as well.


I hope this gives you a few fabulous ideas if you’re planning on having any Halloween party games!

Find me on Instagram at dimestoregypsygal. I’d love to see what you come up with. Leave me a msg. or pics.

Thanks for reading,

~The Dimestore Gypsy


Holidays

3 Fun & Inexpensive Halloween Party Games Your Guest Will Love!

Halloween is almost here, can you believe it? Each year I throw a party and go all out with our decor and games/prizes for the kids. I love entertaining and this happens to be my favorite holiday! I enjoy seeing everyone have a good time, especially the kids.

Today I’m sharing 3 awesome game ideas I used last year that the kids loved. I have a mixture of pre school to young teens (12-13) and they all enjoyed these so if you’re looking for some ideas for your party, look no further.

The first game is the Pumpkin Poke! This is great! It’s inexpensive to make and you can fill the cups with any “treats” you like. Keep in mind the age range of the children that will be at your party so you can plan accordingly. For myself, I made 2 of these and placed them side-by-side. I used and assortment of candy, ear buds, light up bounce balls, Halloween socks, fake ugly teeth, sticky mustaches, and finger skateboards from Dollar Tree. I left a few cups empty for a “trick’ but allowed whoever received a trick to play until they won. At the end, the children traded each other if someone had something they wanted. Check out the link below for a great tutorial at sheknows.com on how to make your own.

promo236959881.jpg
sheknows.com


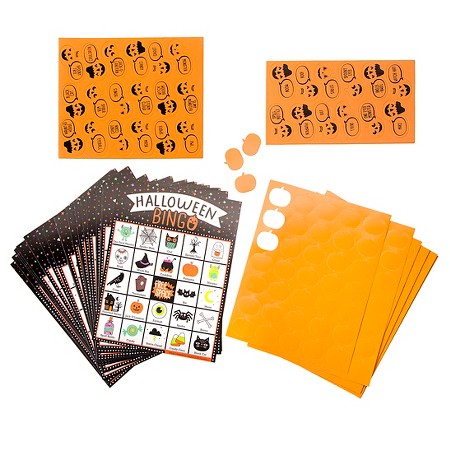
Next is this fun Halloween bingo kit I found at Target. It comes with everything you see and is only $5.00! We ended up playing about 3 games and the kids didn’t want to give it up. I’ve linked it down below for you.


50918075.jpg
Target.com


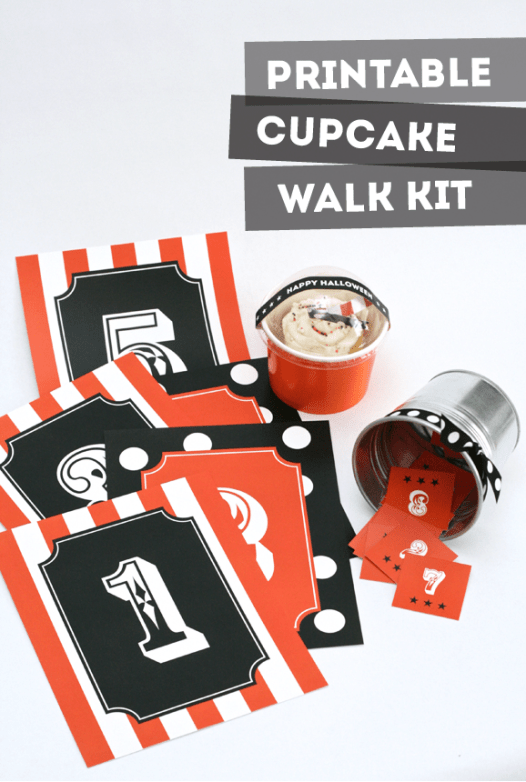
The last game I have for you is a freebie from pagingsupermom.com. What is a Halloween party with out a cake walk?  I used white paper to print the numbers so they would stand out with the black light. I only ended up using numbers 1-10. I arranged them in a large circle in the garage and secured them to the pavement with a few pieces of packing tape. For the goodies, I made 2 loaves of pumpkin bread, and 2 small cakes. We did 1 drawing every hour until the goodies were gone. All the kids were super anxious to play so they could win something good!


CakeWalkKitPrintable.png
pagingsupermom.com


These games were a big hit at our party. The kids all had a great time and I even had a few adults join in on the cake walk. If you’re looking for some game ideas that have been tried and tested, these are the way to go!

Thanks for reading! You can find me on Instagram at dimestoregypsygal. Let me know if you use any of these games and if they worked for you. I’d love to hear about it!

~The Dimestore Gypsy


Holidays · Home Decor

Whimsical Witch Themed Mantle Decor

Hello and welcome back! Halloween is just a few weeks away and I wanted to share my mantle decor with you. I have been collecting items here and there and have some fun projects to share so I’ll get right into it.

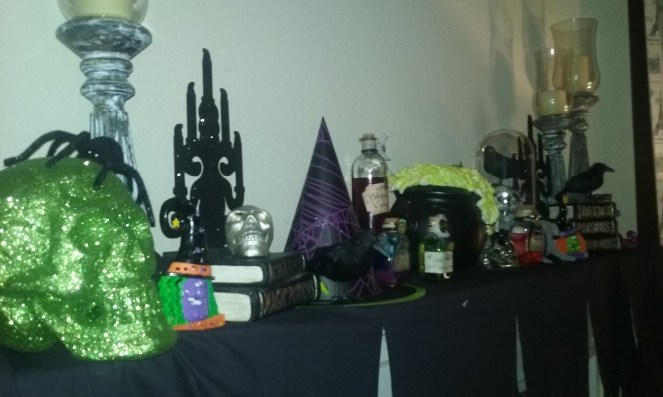
20161014_20552120161014_205445

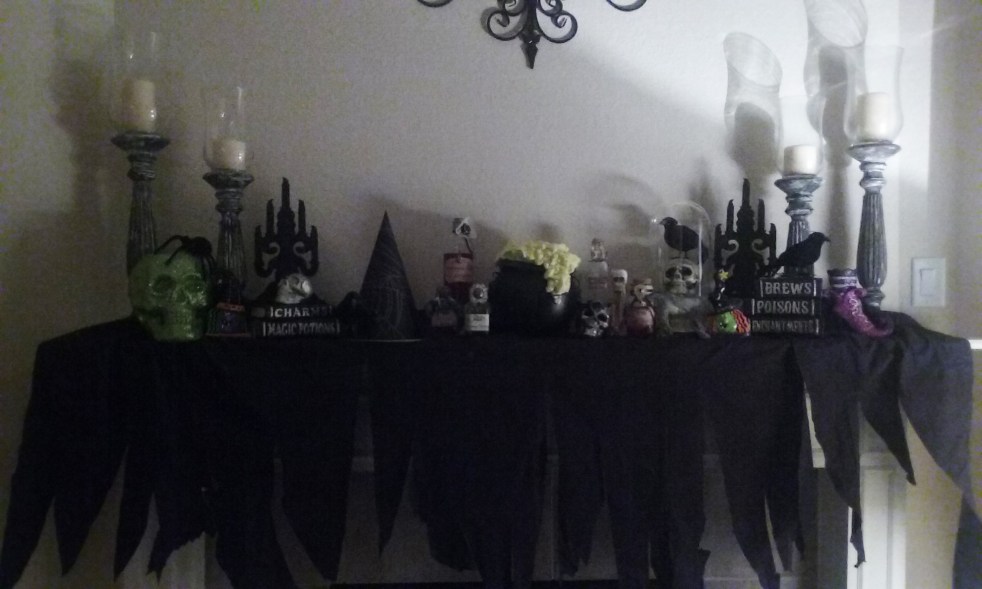
So first to cover the mantle, I used a black twin size flat sheet. I cut big tattered slits on one side to give it that old, creepy effect. The large brown candelabras were already there and stay up year round so I didn’t mess with those. The faux potion books are from Michaels and I actually got these at 70% off. They came out to about 6.75 ea. Such a good deal! I’ve linked these below. If you find them in your store I believe they are still doing and additional 20%.


10478078
Stack of Magic Books by Ashland 8.49


The crows, black glittered candelabras, and witch hat are from Dollar Tree. The 2 small witches (purple & green) are tea light holders and I found the set for a few dollars at a resale shop. The large green skeleton skull I found at Ross for 5.99! I saw a few of these in other stores as well in different colors.

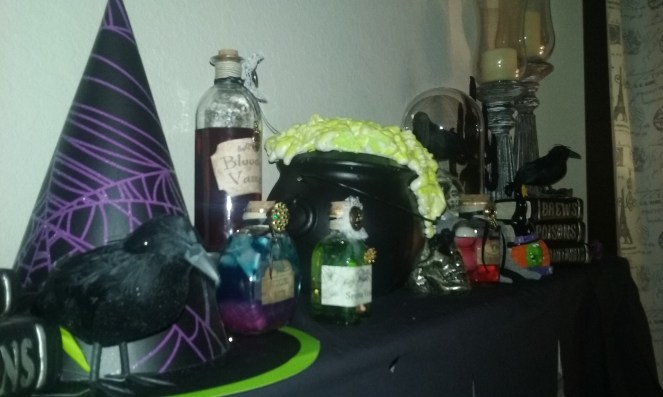
The black brew pot is from Dollar Tree and was pretty fun to make. I found my black kettle from Dollar Tree and you can pretty much find these at any store that has Halloween decor. I used some spray foam sealant and let it dry. Once it was dry I painted just a little of the top to give it some color.

20161014_205539-2


Now for my fun apothecary jars! This was probably my favorite things I’ve done so far. You can really get creative and use your imagination. I found the jars on sale at Hobby Lobby. You can really use any jars you like. I liked these because of the cork topper. Now you just need some embellishments like buttons, broken jewelry, lace, ribbon, etc. and some twine/cording to finish off your bottles. You’ll also need hot glue to seal your bottles.


I found a really great simple tutorial by LunarFoxCrafting on You Tube. Here’s the link to the video:https://www.youtube.com/watch?v=IqwvAx9FzOY. I printed my own labels I found online and skipped the tea step. Other than that, I followed the video and they came out great. Using the soap works really well!


If you decide to make some fun jars I want to see! You can find me on Instagram @dimestoregypsygal.

Thanks for reading,

~The Dimestore Gypsy

DIY

$13 Halloween Wreath Makeover!

20160927_172247-1

This is by far my favorite time of the year. I love when the time changes and the nights get longer, the weather gets cooler, and you can find pumpkin flavor in just about everything!

So, I have to share this story with you guys. I’m starting to decorate my home for Halloween and I’m not too impressed with my wreath for my front door. It was something I just threw together when I was younger and I’ve had it for years. I never got around to updating it.


20160926_154929.jpg
The Dimestore Gypsy


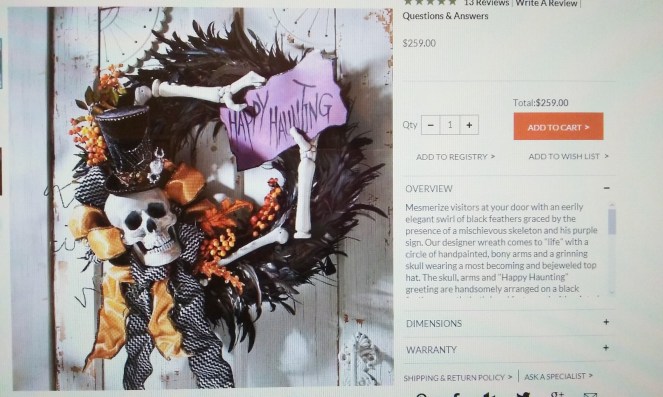
It’s not too bad but I had my heart set on a wreath I came across last year on Pinterest.

After seeing my little plain one, I thought,  “I’m just going to buy the one I really want and be done with it”.


20160927_174023
grandinroad.com


So here it is and OMG!! I about had a heart attack! While it is gorgeous, I can’t even imagine spending that much on a wreath. I was kind of bummed because I just fell in love with this one. I’m all about  creating something fab, so I set out on a mission to find supplies to make my own and as low-cost as possible.

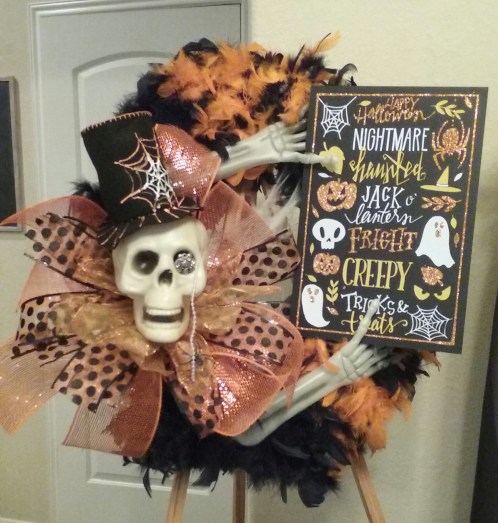
I was at Dollar Tree a few days ago looking at their Halloween decor and was super excited to find these plastic skulls and glow in the dark skeleton arms! I got 2 arms and a skull to use for the skeleton.


Next, I found these feathered boas in the kids costume aisle. I bought 3 black, and 2 orange/black to alternate around the wreath like the feathered one.


226838
dollartree.com


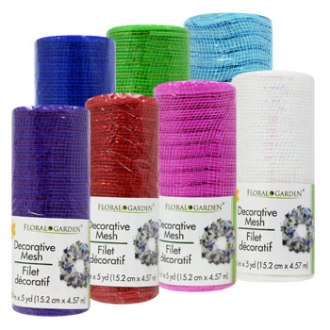
They happened to have some Halloween wired ribbon so I got 1 of the orange sheer fall prints, 1 sheer orange/black dot, and I roll of the orange/metallic deco mesh to use as the collar around the skull.


207237
dollartree.com


They also had some cute decorative wooden signs so I picked one that had orange, black, and yellow to match the rest of the wreath for the skeleton to “hold”.


dollar-tree-halloween-2015-2
dollartree.com


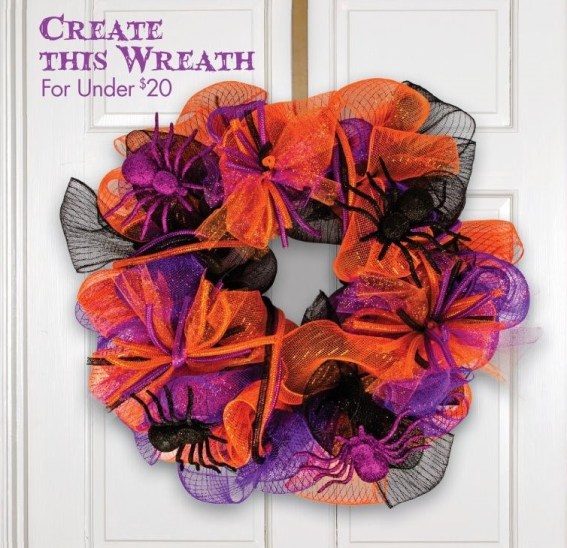
I was so excited and came straight home and got started. It was a labor of love and so rewarding to see the finished product. I only spent $13 dollars on supplies to makeover the one I already had. If you wanted to make one and you don’t have a wreath, you can get one at any craft store. I used the 18″ grapevine wreath from Hobby Lobby (5.99) and used my 40% off coupon. With the wreath and supplies It will put you right under $20.00. Not a bad deal at all!

This slideshow requires JavaScript.


I’m really happy with my new wreath and will enjoy it for years to come.  I hope this inspires you to get out and see what you can do. You don’t have to spend a lot to make something fabulous!

Here’s a link to a cute, inexpensive Halloween wreath project from Dollar Tree using their products. Click on the Halloween look book and it will have the supply list and instructions.


dol_hwn16flx_57ede30fa1f24-2
Dollar Tree Deco Mesh Wreath DIY


I’d love to see your fabulous projects! Leave a message or comment and I’ll get back to ya. You can find me on Instagram at dimestoregypsygal.

Thanks for reading,

~The Dimestore Gypsy


.


DIY

DIY Bill Receipt Organizer for Under $10

So we all have to pay bills each month and if you’re like me, you still get paper statements in the mail. My spouse pays the bills and then leaves the paperwork on my desk for me to file or shred. I had a cheap little home bill organizer from a discount store but it just wasn’t holding up. The paper pockets were starting to tear, receipts were slipping out, and the band to help it stay close was starting to bend the pockets. I thought, “I really need to re-organize this”.

One day while I was out school shopping I saw this cute mini binder and I got the idea to use this for my bill receipts. It’s 9 x 7 and the perfect size. I got this one from Wal-Mart for $3.88! You can also find these at the Target dollar spot for $3.00 in cute patterns as well.


20160803_145431.jpg

I went down the office supply aisle to find some mini page protectors. Here are the ones I used and they were $2.49 for this 15 pack.  These will be used to hold receipts for each month.


20160824_134800.jpg

I wanted to have a divider for each month and I found this 8 pack with tabs at the Dollar Tree. I cut these down to fit my binder.


20160823_153253.jpg

To cut these down, I placed one of the mini page protectors under the divider and lined the edges of the tab and page protector together. Then I just marked my length and width and trimmed it up to get the divider the size of the mini page protector. On the edge where my hole punches would be, I just trimmed a straight line down to make it easier. Then I marked/punched the holes.


I put the binder together with the month and a mini page protector behind it. After December, I made one extra divider and labeled it “Important”. Each month I keep a receipt or pay stub with important info. like the date, amount paid, and total for each bill. At the beginning of the new year, I take all the receipts out for each month and I shred them. The “Important” tab is for receipts/paperwork that I need to keep longer and those will be filed in my bigger filing system that’s stored away.

After I organized all my receipts, I took a piece of scrap elastic tape and measured around the binder leaving a little room so the binder wouldn’t bend when full. I sewed the piece together and slipped it over the side to hold it closed. Another great idea is to use one of those elastic headbands. You could get really creative and embellish yours or find one at a discount store. I think I may just go back and do that for my mine!

20160823_202419.jpg


This is a simple receipt organization system and  can be modified for any organizational system you need.  I hope you enjoyed this little inexpensive diy project. Don’t forget, you can find me on Instagram @dimestoregypsygal! If you have any questions or comments feel free to msg. me.

Thanks for reading,

~The Dimestore Gypsy


DIY

$10 DIY Refrigerator Command Center

Well school is right around the corner not only for the kids but this gal too! I’ll be back to school for the fall semester and I’m looking forward to it. It’s one of my favorite times of the year because I know fall will be here soon along with all my favorite holidays!

Last week I updated my planner and as I was making my inserts, I noticed I don’t have a calendar in my home. I used the calendar on my computer to finish the planner inserts and I realized,  I really need to get a calendar! We’re always checking our phones or asking each other what the date is. So I decided I’m going to make a command center on the refrigerator wall. It’s the perfect spot for all the family to see.

I started thinking about how I wanted to make the calendar and decided on a dry erase board. That would be easiest and we can wipe everything off each month and start over.  I started shopping online and I found a few I liked at Wal-Mart.com and Target.com.  They were priced at about $15.00 to $20.00 for a medium-sized board. We were out school supply shopping on Monday at Wal-Mart and look what I found…

20160803_134203.jpg

Right in the school supply aisles were these dry erase calendars for $6.88! They are a good size too. I thought this is perfect. It comes with a dry erase marker and holder on top. The bottom note part is magnetic and you can use the little square cork magnet for small notes, etc. I picked one up and headed to the craft aisle to look for some magnets or magnetic strips for the back to hold it to the refrigerator. I found this 18 pack of magnetic tape strips for $.97. Any magnets will do just make sure they have an adhesive side so you can add it to the back of your board.


20160803_134729.jpg

When I got home I took the calendar out of the packaging and added some magnetic strips to the back like so.

20160803_135214.jpg


I flipped it over and added my dates and it was ready to go on the refrigerator.

For fun, I added a dry erase menu for weekly dinner planning. Here’s how you can make one for yourself.

Supplies:

black picture frame (I picked up one from the Dollar Tree)

leftover magnetic strips

Menu Template


Instructions:

If you have any metal hangers on the back you’ll want to remove those so you don’t scratch your refrigerator. These metal hangers were tapped to the inside so I just removed the tape and the metal pieces slid right out.

20160803_135732.jpg


Next, remove the back and clean your glass inside and out if you have smudges or dirt. Once you’re done cleaning, put your glass back in and add your menu insert. You can now add the back and close your frame. Add one magnetic strip to the top and the bottom like so and your dry erase menu is ready to hang.

20160803_13591120160803_144615


Be sure to check out your Wal-Mart for these dry-erase calendars if you’re needing one. Great price point and great for family organization! I hope you enjoyed my organizational diy and thanks for reading.

~The Dimestore Gypsy