DIY

DIY Stationary Gift Basket

Hello! Hope you enjoyed your holiday! I wanted to share my gift “baskets” I made for our family Christmas party. We always do the White Elephant gift exchange each year for the adults so I thought I’d share these fun gift ideas. Not only are they fun for the gift exchange, but these gifts can be made and used for any occasion; Mother’s Day, Father’s Day, Birthdays, etc.

I went to Marshalls with a plan to find gourmet nuts and such to put in the beer crate I was putting together. I went down the other aisles 1st to get an idea for a ladies gift and came across this gorgeous white leather planner and it was only $4.99! I dropped it in the basket because it was definitely going home with me.

20161223_132542-2


As I moved further down the aisle, I spotted the cute wooden mail sorter at $9.99 and the gold polka dot clipboard with notepad at $3.99. This gave me the idea for the stationary gift basket.

20161223_133755 (2).jpg


I ended up stopping at Michael’s and Dollar Tree and was able to find a sassy 2 pack of blank cards, a pocket notebook, a cut writing pen, some paper fill, and a shrink-wrap bag with a bow.

Went I got home I checked my stash and found some glass magnets I had made for a craft fair a while back. I had a few clear and gold glass buttons in my sewing supplies so I used those to make a few fancy paper clips. I bagged these up nicely with some pink cardstock from my scrapbook paper supply.

*(The paper clips, glass pebbles, and magnets can be found at Dollar Tree. For the magnets, just find some small cute images from a magazine, cut them out, and adhere them with some Modge Podge to the pebble. Glue your magnets with some E6000 the back and voila!)


I arranged all the items together in the mail sorter and put a little paper fill in each slot. I bagged it up with the shrink-wrap and added the bow and a fun little Christmas tag.

My sis n law ended up stealing the gift and is super excited to use it on her desk at work!

I hope this gives you an idea on how you can make your own fabulous gift basket that won’t break the bank.  Check back soon for my DIY Beer Crate!

Thanks for reading and Happy Holidays,

~The Dimestore Gypsy


DIY · Holidays

Whimsical Mason Jar Snow Globe DIY

Happy Holidays! I’m sharing this whimsical mason jar snow globe DIY. They are so beautiful in the light! I made quit a few and grouped them together around my home. Read on for details on how to make your own.

Supplies:


If you don’t happen to have any jars saved, you can find them at Michael’s craft store. The smaller ones are everyday value at $1.00 and the larger are $2.99 regular price. I found my smaller ones at Dollar Tree and I saved a few Atlas pasta sauce jars for the larger size.


Next you’ll need the mini trees. You can find a variety of these at the craft store in all kinds of colors and sizes. I picked a few shades of green for myself. Here are a few options from Michael’s. (mini 6 pack on the left/$2.99 and medium 3 pack on the right/$3.19)


Here are a few different options for the base. I always grab these when I find them on sale because I know I’ll be using them for different projects. (I don’t pay over a dollar or two for each.) I was lucky to find a few of the middle ones at Dollar Tree. I like to group the finished jars together so it looks great when you have different sizes and shapes. You can find these at most craft/home stores.


And of course, you’ll need snow and craft glue. All of these products can be found at your local craft store. I found my snow spray and filler at Dollar Tree and the craft glue at Michael’s. Be sure to grab the clear craft glue. I have seen it come in white and black. (Make sure to use industrial strength adhesive for your base, you don’t want your jar coming off the base.)


Instructions:

Hold your mason jar in one hand and with the other take your snow can and hold it about 4 to 5 inches above the opening. Spray a small short burst into the bottom of the jar to add some snow and texture to your jars. (This is a little messy and may get on your hand. Use gloves and wash if you get any on your skin.) Let sit for about and hour to dry.


Once dry, add about 1/4 jar of snow fill.

20161214_115553.jpg


Next, glue your tree down to the inside piece of the lid. (I used hot glue here to speed up the process.) Once it’s dry, place it in the jar and screw the lid on.


All you have to do now is put a little bit of craft glue around the rim of your base, center it on the lid, and let dry. Once it’s dry you can flip it right side up and start decorating!


These are on my kitchen hutch with my gingerbread tree. Don’t they look great!

20161214_120154


Thanks for reading, hope you enjoy this project!

~The Dimestore Gypsy

DIY

$13 Halloween Wreath Makeover!

20160927_172247-1

This is by far my favorite time of the year. I love when the time changes and the nights get longer, the weather gets cooler, and you can find pumpkin flavor in just about everything!

So, I have to share this story with you guys. I’m starting to decorate my home for Halloween and I’m not too impressed with my wreath for my front door. It was something I just threw together when I was younger and I’ve had it for years. I never got around to updating it.


20160926_154929.jpg
The Dimestore Gypsy


It’s not too bad but I had my heart set on a wreath I came across last year on Pinterest.

After seeing my little plain one, I thought,  “I’m just going to buy the one I really want and be done with it”.


20160927_174023
grandinroad.com


So here it is and OMG!! I about had a heart attack! While it is gorgeous, I can’t even imagine spending that much on a wreath. I was kind of bummed because I just fell in love with this one. I’m all about  creating something fab, so I set out on a mission to find supplies to make my own and as low-cost as possible.

I was at Dollar Tree a few days ago looking at their Halloween decor and was super excited to find these plastic skulls and glow in the dark skeleton arms! I got 2 arms and a skull to use for the skeleton.


Next, I found these feathered boas in the kids costume aisle. I bought 3 black, and 2 orange/black to alternate around the wreath like the feathered one.


226838
dollartree.com


They happened to have some Halloween wired ribbon so I got 1 of the orange sheer fall prints, 1 sheer orange/black dot, and I roll of the orange/metallic deco mesh to use as the collar around the skull.


207237
dollartree.com


They also had some cute decorative wooden signs so I picked one that had orange, black, and yellow to match the rest of the wreath for the skeleton to “hold”.


dollar-tree-halloween-2015-2
dollartree.com


I was so excited and came straight home and got started. It was a labor of love and so rewarding to see the finished product. I only spent $13 dollars on supplies to makeover the one I already had. If you wanted to make one and you don’t have a wreath, you can get one at any craft store. I used the 18″ grapevine wreath from Hobby Lobby (5.99) and used my 40% off coupon. With the wreath and supplies It will put you right under $20.00. Not a bad deal at all!

This slideshow requires JavaScript.


I’m really happy with my new wreath and will enjoy it for years to come.  I hope this inspires you to get out and see what you can do. You don’t have to spend a lot to make something fabulous!

Here’s a link to a cute, inexpensive Halloween wreath project from Dollar Tree using their products. Click on the Halloween look book and it will have the supply list and instructions.


dol_hwn16flx_57ede30fa1f24-2
Dollar Tree Deco Mesh Wreath DIY


I’d love to see your fabulous projects! Leave a message or comment and I’ll get back to ya. You can find me on Instagram at dimestoregypsygal.

Thanks for reading,

~The Dimestore Gypsy


.


DIY

DIY Bill Receipt Organizer for Under $10

So we all have to pay bills each month and if you’re like me, you still get paper statements in the mail. My spouse pays the bills and then leaves the paperwork on my desk for me to file or shred. I had a cheap little home bill organizer from a discount store but it just wasn’t holding up. The paper pockets were starting to tear, receipts were slipping out, and the band to help it stay close was starting to bend the pockets. I thought, “I really need to re-organize this”.

One day while I was out school shopping I saw this cute mini binder and I got the idea to use this for my bill receipts. It’s 9 x 7 and the perfect size. I got this one from Wal-Mart for $3.88! You can also find these at the Target dollar spot for $3.00 in cute patterns as well.


20160803_145431.jpg

I went down the office supply aisle to find some mini page protectors. Here are the ones I used and they were $2.49 for this 15 pack.  These will be used to hold receipts for each month.


20160824_134800.jpg

I wanted to have a divider for each month and I found this 8 pack with tabs at the Dollar Tree. I cut these down to fit my binder.


20160823_153253.jpg

To cut these down, I placed one of the mini page protectors under the divider and lined the edges of the tab and page protector together. Then I just marked my length and width and trimmed it up to get the divider the size of the mini page protector. On the edge where my hole punches would be, I just trimmed a straight line down to make it easier. Then I marked/punched the holes.


I put the binder together with the month and a mini page protector behind it. After December, I made one extra divider and labeled it “Important”. Each month I keep a receipt or pay stub with important info. like the date, amount paid, and total for each bill. At the beginning of the new year, I take all the receipts out for each month and I shred them. The “Important” tab is for receipts/paperwork that I need to keep longer and those will be filed in my bigger filing system that’s stored away.

After I organized all my receipts, I took a piece of scrap elastic tape and measured around the binder leaving a little room so the binder wouldn’t bend when full. I sewed the piece together and slipped it over the side to hold it closed. Another great idea is to use one of those elastic headbands. You could get really creative and embellish yours or find one at a discount store. I think I may just go back and do that for my mine!

20160823_202419.jpg


This is a simple receipt organization system and  can be modified for any organizational system you need.  I hope you enjoyed this little inexpensive diy project. Don’t forget, you can find me on Instagram @dimestoregypsygal! If you have any questions or comments feel free to msg. me.

Thanks for reading,

~The Dimestore Gypsy


DIY

$10 DIY Refrigerator Command Center

Well school is right around the corner not only for the kids but this gal too! I’ll be back to school for the fall semester and I’m looking forward to it. It’s one of my favorite times of the year because I know fall will be here soon along with all my favorite holidays!

Last week I updated my planner and as I was making my inserts, I noticed I don’t have a calendar in my home. I used the calendar on my computer to finish the planner inserts and I realized,  I really need to get a calendar! We’re always checking our phones or asking each other what the date is. So I decided I’m going to make a command center on the refrigerator wall. It’s the perfect spot for all the family to see.

I started thinking about how I wanted to make the calendar and decided on a dry erase board. That would be easiest and we can wipe everything off each month and start over.  I started shopping online and I found a few I liked at Wal-Mart.com and Target.com.  They were priced at about $15.00 to $20.00 for a medium-sized board. We were out school supply shopping on Monday at Wal-Mart and look what I found…

20160803_134203.jpg

Right in the school supply aisles were these dry erase calendars for $6.88! They are a good size too. I thought this is perfect. It comes with a dry erase marker and holder on top. The bottom note part is magnetic and you can use the little square cork magnet for small notes, etc. I picked one up and headed to the craft aisle to look for some magnets or magnetic strips for the back to hold it to the refrigerator. I found this 18 pack of magnetic tape strips for $.97. Any magnets will do just make sure they have an adhesive side so you can add it to the back of your board.


20160803_134729.jpg

When I got home I took the calendar out of the packaging and added some magnetic strips to the back like so.

20160803_135214.jpg


I flipped it over and added my dates and it was ready to go on the refrigerator.

For fun, I added a dry erase menu for weekly dinner planning. Here’s how you can make one for yourself.

Supplies:

black picture frame (I picked up one from the Dollar Tree)

leftover magnetic strips

Menu Template


Instructions:

If you have any metal hangers on the back you’ll want to remove those so you don’t scratch your refrigerator. These metal hangers were tapped to the inside so I just removed the tape and the metal pieces slid right out.

20160803_135732.jpg


Next, remove the back and clean your glass inside and out if you have smudges or dirt. Once you’re done cleaning, put your glass back in and add your menu insert. You can now add the back and close your frame. Add one magnetic strip to the top and the bottom like so and your dry erase menu is ready to hang.

20160803_13591120160803_144615


Be sure to check out your Wal-Mart for these dry-erase calendars if you’re needing one. Great price point and great for family organization! I hope you enjoyed my organizational diy and thanks for reading.

~The Dimestore Gypsy


DIY

I’m a Planner Newbie!

I’ve been loving the planner craze that’s taking over. I’ve seen so many creative ideas on Instagram and Pinterest from designing the inserts, to all the fun dashboards for decor and supplies. I myself love having an agenda/planner. I can write all my appointments, class work due dates, etc. down and not forget where they are. It just makes my day run smoothly being organized.

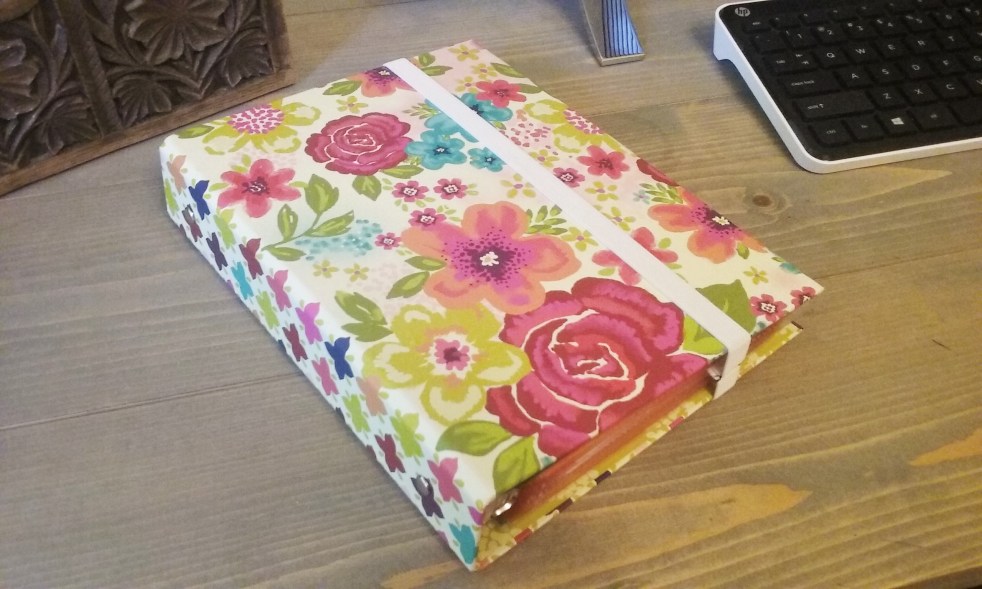
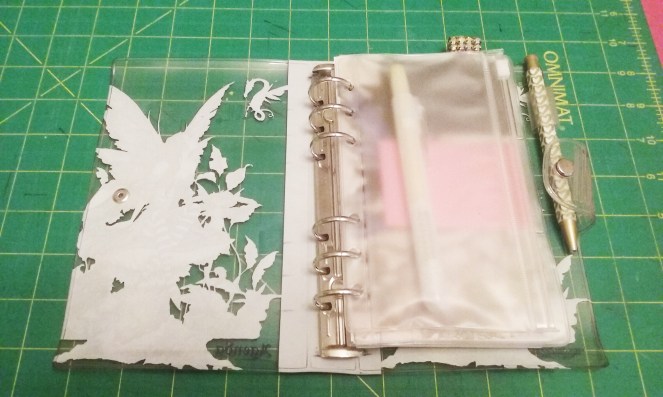
My current agenda is plain and about to end at the end of this month so I thought what a perfect time for me to get into this planner craze and get something fun. I was organizing one of my craft table drawers  the other day and tucked away at the back was my Amy Brown Art agenda! I remember receiving this as a gift when I was a late teen. I’m a little obsessed with fairies and if you know of Amy Brown Art, you know what I’m talking about! Anyways, I thought…this is so pretty. I must have tucked this away a long time ago because I didn’t even know I still had it.

20160726_134400 (2).jpg


I mean hello, gorgeous! This is perfect. It has an agenda, notes, and phone list section. I watched a few newbie planner tutorials to cover the basics and I was ready to go. First I created my inserts (agenda pages) in Microsoft Word. Did you know if you’re a student you can create a free online account? Check it out at microsoftoffice.com. All you need is a student email address to start.

20160726_133523.jpg


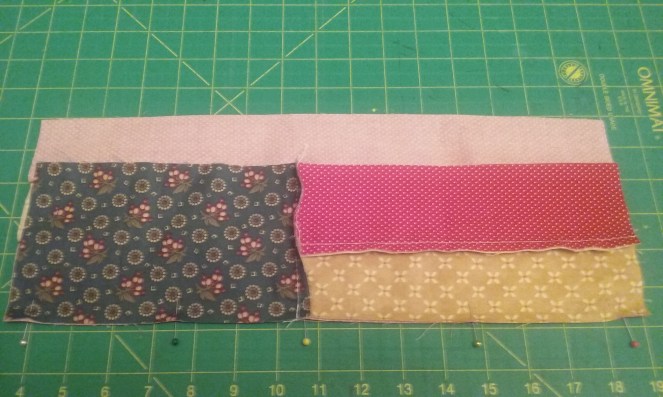
After doing some research, I found out this is a personal size planner. The pages measure at 3.75 x 6.75. I recommend if you have never created an insert to definitely do your research so you can understand how they print and the layout, etc. It’s not too complicated but it took me a couple of tries before I got them printing correctly. After they printed, I cut them to size and put them in my agenda.

Next, I wanted to create a fun little shaker dashboard insert but I didn’t have a fuse tool. I got to thinking how could I make one without having to go out and buy this tool and then I decided to make one with needle and thread.

20160721_154158.jpg


Here’s some instructions on how to make your own.

Supplies:

hand sewing needle

thread of your choice

clear page protector

whatever you want to put inside for decor (paper, sticker, scrapbook decals, picture, etc.)

filler (sequins, small buttons, seed beads, confetti, etc.)

scissors, rotary cutter, or paper-cutter

Directions:

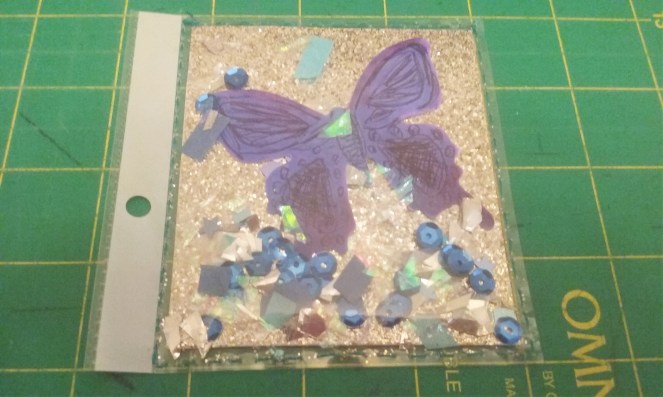
First, insert a sheet of paper into your protector (it makes it easier to cut). Cut the page down to the size you want your shaker to be leaving the hole punched side attached. I made my 4 x 4, with the actual insert area being 3.25in.


Next, take about an arm’s length of thread and thread it thru your needle. Leave about a 4-5in over hang so that when your sewing your thread doesn’t slip off the needle. Knot the opposite end. (This will stop your thread from coming thru). Start at the top left corner and make a running stitch all the way around leaving an opening at the top. When you get to the top right corner, don’t cut your thread. Hold it off to the side so when your done filling your shaker you can close it off.

20160721_142825


*If you’ve never done this, start at the top left corner. Hold your needle on the under side and push it thru the plastic and then pull up all the way until your knot touches the plastic. You will move over just a little from where the needle came up and you then push your needle down thru the plastic. Pull the needle down thru the plastic and that is one stitch. Continue to do the same thing all the way around. When you come to a corner, you will come up close to your last stitch like an “L” shape and continue the same steps of weaving in and out. When you get to the top right corner, don’t cut your thread. Hold it off to the side so when your done filling your shaker you can close it off.


Now the fun part! Fill your shaker with whatever you desire. Be sure to add all your goodies and then add your filler to the front of the shaker. I used a piece of gold glittered scrapbook paper cut down to 3.25 x 3.50, a butterfly die cut that I colored, some blue sequins, and some confetti from a clearance out confetti popper I found at Michaels.

20160721_154158.jpg


When your finished filling your shaker, take your needle and thread and continue making stitches until you reach your starting point. Here you will want to finish on the underside and knot off your thread. You can put a dot of craft glue here if you like.

*Newbie-stitch to the end and on your last stitch your needle and thread will need to be on the underside. Your going to loop your thread under the last stitch on the underside. Take the needle and put it thru the loop and pull snugly to create your knot. You can do this twice to secure.


Now you can hole punch your shaker and add to your planner. If you don’t like the plain white side with the hole punches, add a strip of decorative washi tape to the front and back here to  create a nice area to add your punches.

20160721_155042.jpg


Next, I made some fun little embellished paper clips to use for my pages and bills, paperwork, etc.

20160708_201123.jpg


All you need is some paperclips, stickers/embellishments, ribbon, and hot glue. You can really get creative and personalize your paperclips with spray paint also. Just spray paint them first and let them dry before you add your embellishment. Then add a dab of hot glue or E6000 to your embellishment, lay your paper clip on top and let dry. I ended up using the bottom right jeweled one for my planner.

The planner came with a plastic card divider but I just added some sticky notes and a flat paper clip and placed it at the front so I don’t have to dig for them. I backed it with some decorative paper with a pull tab to I can access them more easily.


20160721_210710

It also came with a zippered pouch so I put a click top highlighter in here to mark my important dates.

20160728_114530

If you’re thinking about jumping on the planner craze, go for it! A lot of craft stores sell planner kits with everything you need to get started. They can become pricey depending on what you get so be careful…it’s addicting! I know the dollar spot at Target always has cute planner inserts, binders, sticky notes, etc. for planning that are more budget friendly.

Thanks for reading and if you have any questions just leave me a message or comment. If you decide to make a shaker, I want to see! You can find me on Instagram at dimestoregypsygal.

Thanks for reading,

~The Dimestore Gypsy


DIY

DIY Patriotic Table Runner

Hello and welcome back!  Thanks for all the love and support! I was looking forward to posting this past week but time got away from me and I wasn’t able to. I am happy to finally be able to share this project with you.

So this week  I designed a patriotic table runner for you. It’s got a vintage, country western vibe. You could also use some more traditional colored fabric if you like and it would be just as nice. This is an advanced project because it requires some applique/quilting experience. You can complete your project by having it quilted or quilting it yourself.

To get started here’s  few supplies you’ll need:

red fabric-1 fat quarter

white fabric-1 fat quarter

blue border/stars/binding-1 yd. (I always like to included extra)

backing fabric-1 yd.

star_template

double-sided fusible web for star applique (I buy the Heat n Bond roll from Hobby Lobby)

basic sewing/quilting supplies (scissors, rotary cutter, cutting mat, sewing machine, etc.)

iron for pressing seams


Sewing Instructions:

First you’ll need to cut your red and white strips.

red-cut 7 strips at 2.5W x 10L

white-cut 6 strips at 2.5W x 10L

20160616_125928


Next, you’ll sew your strips alternating red and white. Start with a red strip and align your edges wrong sides together. Pin in place and sew a 1/4 in seam.


You should have something like this when finished. (I like to sew my strips in pairs and then sew the pairs into larger groupings instead of adding on one strip at a time.) Take this to your iron and press your seam. (When pressing you’ll want to lay both pieces of the seam to one side and press.)


20160616_130250.jpg

Continue alternating your strips (wrong sides together, edges matching) sewing a 1/4 in seam. Your set of stripes should start with a red strip and end with a red strip. Don’t forget to press your seams as you go.


Now you will cut your borders from the blue fabric. Cut 2 strips at 2.5W x 24.5L. (Cut your strips at 2.5W x the length of the fabric 1st, and then cut your strips down to your length of 24.5.)

Align 1 of your border strips to the top of your center piece wrong sides together and pin in place. Sew a 1/4 in seam.*In the photo my border has been pieced so don’t mind the seam. Yours will not have this middle seam.


20160616_154018.jpg

Take your 2nd border strip and align it to the bottom of your center piece wrong sides together and pin in place. Sew a 1/4 in seam. Iron and press both of those seams down. When your finished you’ll having something like this


20160616_154415.jpg

For your side borders you’ll need to cut 2 pieces at 5.5W x 13.75L. Take one of those border pieces and align it to the side of your centerpiece  wrong sides together and pin in place. Sew a 1/4 in seam. Repeat this step for the other side.


20160616_163356.jpg

Now you will need your fusible web and the star template. Take your template and lay it under the rough side of your fusible web. You’re going to trace three stars. Do not cut these out yet, but be sure to leave room in between the stars to cut them out. After you have traced your stars, lay the fusible web sheet you just traced on top of your fabric. Trim your fabric around the sheet of fusible web leaving about 1/2 in extra of fabric all around, this way you won’t get any glue on your iron or ironing board. Take your fabric to your ironing board and lay it down with the wrong side up. Now you will lay your fusible web rough side down on top of your fabric. Press the fusible web until all of the web has adhered to the fabric. Now you can cut out your three star pieces. *(I was a little short on fusible web so I just pieced the fusible web on my last star.)


20160616_183438.jpg

After cutting, remove the white protective paper. Arrange the stars on your center stripes with the shiny side down. Now you can press these into place until the star and points are adhered. You are now ready to applique them down. My machine doesn’t have a button stitch so I just used a small zigzag all the way around the star.


20160616_183647

Here’s the completed top! You’re now ready for quilting and binding. I’ve been practicing free motion quilting on my sewing machine so I decided to try it out myself. I’m happy with the result and it was fun trying it out!

20160616_18375720160619_135929


I hope you enjoy this project as much as I did and I’ll be posting again soon! Feel free to message me with any questions and don’t forget you can find me at #dimestoregypsygal on Instagram. Thanks for reading!

~The Dimestore Gypsy


DIY

DIY American Flag Rag Quilt


I love decorating my home each holiday, but when I checked my storage I realized I didn’t have any decor for Memorial Day/Independence Day! So, this month I’ll be sharing some DIY and décor ideas just in time for July 4th.

This is called a rag quilt because the seams are sewn wrong sides together so the raw edges are showing. After several washes and tumbles in the dryer, the edges begin to fray or get “ragged” out. I found some leftover red, white, and blue fabric in my stash and I thought it would be perfect for this project. However, you can use what ever color/tone of fabric you like. It’s quit simple and easy to make and requires some basic sewing/quilting skills.20160608_150654.jpg


Here is a mini flag that I made just for the purpose of explaining how to sew the seams. To get started you’ll need a few supplies.

1/2 yd. red fabric

1/2 yd. white fabric

1 fat quarter of blue fabric

3/4 yd. backing fabric

rotary cutter/cutting mat

quilting ruler

basic sewing supplies (scissors, pins, sewing machine)

*(the fabric measurements include a few extra inches in case you mess up and I would suggest washing your fabrics separately in cool water so they don’t bleed into each other after construction)

20160608_144537.jpg


Here I have all my strips laid out. You’ll need to cut the following:

red fabric-1st cut 5 strips at 39L x 2.5W, then cut 2 of those  strips in half to get 4 pieces at 19.5L x 2.5W.

white fabric-1st cut 5 strips at 39L x 2.5W, then cut 2 of those strips in half to get 3 pieces at 19.5L x 2.5W. (You can stash the leftover rectangle.)

blue fabric-cut your fat quarter down to 20.5L x 13.5W.

backing-cut your backing down to 39L x 24.5W and set it aside for later.


Instructions:

  1. Take one of your small red strips and pin it to one of your small white strips with wrong sides facing each other, edges lining up and sew a 1/4 in seam.


20160608_144645.jpg

You should now have 2 pieces with a seam going down the middle. The red will be your top and the white will be your bottom.

20160608_144754.jpg

2. Now pin a small red strip to the bottom of the white strip wrong sides together, edges lining up and sew a 1/4 in seam.

20160608_145127.jpg

3. Continue alternating your strips (adding to the bottom, sewing 1/4 in seam) until you have used all 4 red small strips and all 3 small white strips. (Here’s a photo of the larger size just to give you a visual).


20160610_000939.jpg

4. Your going to pin this set of strips to the smaller side of your blue piece wrong sides together, edges lining up and sew a 1/4 in seam. Set this piece aside.


You should end up with something like this. (you will have more stripes than I do)

20160608_150159

5. Now back to those long strips. Starting with a white strip, pin one of your red strips to the bottom wrong sides together, edges matching and sew a 1/4 in seam.


6. Just like before, continue alternating your strips (adding to the bottom, sewing 1/4 in seam) until you have used all 3 white strips and all 3 red strips. (photo of larger size)

20160610_004905.jpg

7. Now your going to pin this set of strips wrong sides together to the piece you put aside earlier. (remember you will have more stripes than shown in this photo so be sure when pinning these two pieces that your stripes are correctly alternating) Sew a 1/4 in seam.

20160608_150401.jpg


Here’s the finished top!

20160608_150654.jpg

8. To finish this flag up, just pin your top to your backing wrong sides together, edges matching and sew a 1/4 in seam all the way around.

20160601_150253.jpg20160610_010735.jpg


Now you can throw your quilt in the washer on cool water and dry a few times to get your top frayed and “ragged” out. The more washes, the better!


I hope you enjoyed this project and if you decide to try it out, leave me a comment or tag me on Instagram @dimestoregypsygal. I’d love to see your flags! Thanks for stopping by!

~The Dimestore Gypsy