
I love decorating my home each holiday, but when I checked my storage I realized I didn’t have any decor for Memorial Day/Independence Day! So, this month I’ll be sharing some DIY and décor ideas just in time for July 4th.
This is called a rag quilt because the seams are sewn wrong sides together so the raw edges are showing. After several washes and tumbles in the dryer, the edges begin to fray or get “ragged” out. I found some leftover red, white, and blue fabric in my stash and I thought it would be perfect for this project. However, you can use what ever color/tone of fabric you like. It’s quit simple and easy to make and requires some basic sewing/quilting skills.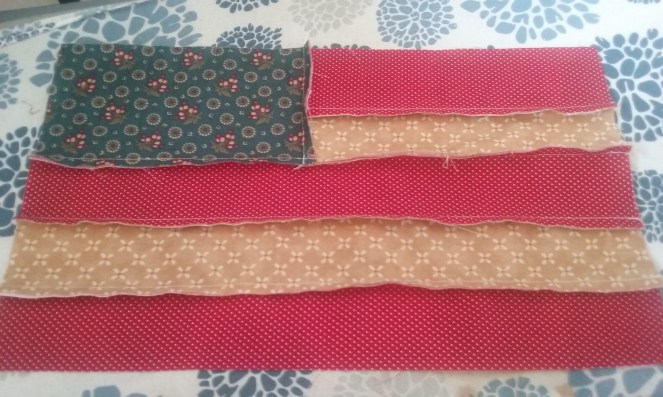
Here is a mini flag that I made just for the purpose of explaining how to sew the seams. To get started you’ll need a few supplies.
1/2 yd. red fabric
1/2 yd. white fabric
1 fat quarter of blue fabric
3/4 yd. backing fabric
rotary cutter/cutting mat
quilting ruler
basic sewing supplies (scissors, pins, sewing machine)
*(the fabric measurements include a few extra inches in case you mess up and I would suggest washing your fabrics separately in cool water so they don’t bleed into each other after construction)

Here I have all my strips laid out. You’ll need to cut the following:
red fabric-1st cut 5 strips at 39L x 2.5W, then cut 2 of those strips in half to get 4 pieces at 19.5L x 2.5W.
white fabric-1st cut 5 strips at 39L x 2.5W, then cut 2 of those strips in half to get 3 pieces at 19.5L x 2.5W. (You can stash the leftover rectangle.)
blue fabric-cut your fat quarter down to 20.5L x 13.5W.
backing-cut your backing down to 39L x 24.5W and set it aside for later.
Instructions:
- Take one of your small red strips and pin it to one of your small white strips with wrong sides facing each other, edges lining up and sew a 1/4 in seam.

You should now have 2 pieces with a seam going down the middle. The red will be your top and the white will be your bottom.

2. Now pin a small red strip to the bottom of the white strip wrong sides together, edges lining up and sew a 1/4 in seam.

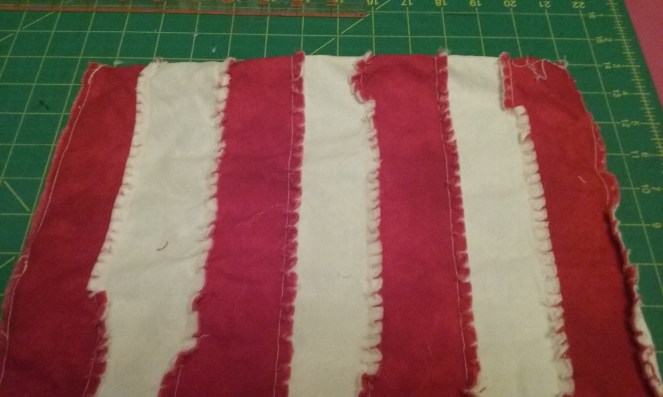
3. Continue alternating your strips (adding to the bottom, sewing 1/4 in seam) until you have used all 4 red small strips and all 3 small white strips. (Here’s a photo of the larger size just to give you a visual).
4. Your going to pin this set of strips to the smaller side of your blue piece wrong sides together, edges lining up and sew a 1/4 in seam. Set this piece aside.

You should end up with something like this. (you will have more stripes than I do)

5. Now back to those long strips. Starting with a white strip, pin one of your red strips to the bottom wrong sides together, edges matching and sew a 1/4 in seam.

6. Just like before, continue alternating your strips (adding to the bottom, sewing 1/4 in seam) until you have used all 3 white strips and all 3 red strips. (photo of larger size)

7. Now your going to pin this set of strips wrong sides together to the piece you put aside earlier. (remember you will have more stripes than shown in this photo so be sure when pinning these two pieces that your stripes are correctly alternating) Sew a 1/4 in seam.
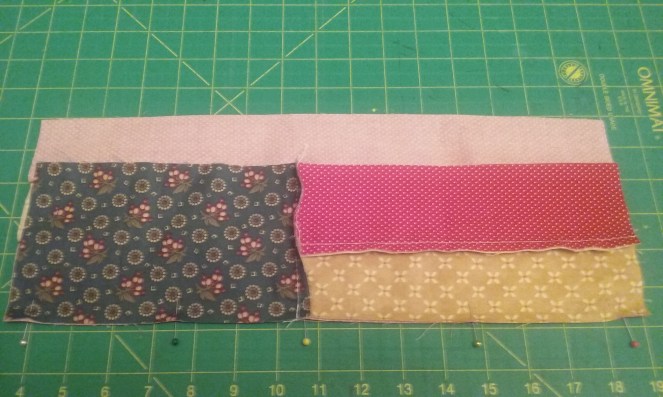
Here’s the finished top!

8. To finish this flag up, just pin your top to your backing wrong sides together, edges matching and sew a 1/4 in seam all the way around.

Now you can throw your quilt in the washer on cool water and dry a few times to get your top frayed and “ragged” out. The more washes, the better!
I hope you enjoyed this project and if you decide to try it out, leave me a comment or tag me on Instagram @dimestoregypsygal. I’d love to see your flags! Thanks for stopping by!
~The Dimestore Gypsy
