Spring is right around the corner and I am sharing this cute birdcage décor DIY. It’s so simple and really easy. All you need is a cage of your choice (use one that has smaller spacing between the bars so your potpourri doesn’t fall thru), and some potpourri vase filler. That’s it!
To assemble: open your cage, fill with the potpourri of your choice, (if you like, you can mix in some decorative balls/pod fillers too) and close the lid. Now you can display your birdcage wherever you like!
I’ve linked some cute cages I found and some potpourri and ball/pod fillers for you too!
*I used a medium-sized cage, 1 bag of ball/pod fillers, and 1 bag of potpourri (keep in mind the larger the cage, the more filler you will need)
Have fun putting yours together and send me a pic if you decide to make one. I’d love to see how you style yours! You can find me on Instagram and Pinterest @thedimestoregypsy.
How cute are these? I was visiting my parents one day and I noticed these cute coasters they had. They’re a really good size (can hold a large cup) and have a good weight. I just loved them and wanted to get some for myself. I never got a chance to go look for some and she surprised me with my own set last week from Cracker Barrel! They go so well with my home decor and I’m loving them.
I found them for you and they’re on sale for 5.99/set! I’ve linked them down below. Happy shopping!
Happy Holidays! I’m sharing this whimsical mason jar snow globe DIY. They are so beautiful in the light! I made quit a few and grouped them together around my home. Read on for details on how to make your own.
Supplies:
If you don’t happen to have any jars saved, you can find them at Michael’s craft store. The smaller ones are everyday value at $1.00 and the larger are $2.99 regular price. I found my smaller ones at Dollar Tree and I saved a few Atlas pasta sauce jars for the larger size.
Next you’ll need the mini trees. You can find a variety of these at the craft store in all kinds of colors and sizes. I picked a few shades of green for myself. Here are a few options from Michael’s. (mini 6 pack on the left/$2.99 and medium 3 pack on the right/$3.19)
Here are a few different options for the base. I always grab these when I find them on sale because I know I’ll be using them for different projects. (I don’t pay over a dollar or two for each.) I was lucky to find a few of the middle ones at Dollar Tree. I like to group the finished jars together so it looks great when you have different sizes and shapes. You can find these at most craft/home stores.
And of course, you’ll need snow and craft glue. All of these products can be found at your local craft store. I found my snow spray and filler at Dollar Tree and the craft glue at Michael’s. Be sure to grab the clear craft glue. I have seen it come in white and black. (Make sure to use industrial strength adhesive for your base, you don’t want your jar coming off the base.)
Instructions:
Hold your mason jar in one hand and with the other take your snow can and hold it about 4 to 5 inches above the opening. Spray a small short burst into the bottom of the jar to add some snow and texture to your jars. (This is a little messy and may get on your hand. Use gloves and wash if you get any on your skin.) Let sit for about and hour to dry.
Once dry, add about 1/4 jar of snow fill.
Next, glue your tree down to the inside piece of the lid. (I used hot glue here to speed up the process.) Once it’s dry, place it in the jar and screw the lid on.
All you have to do now is put a little bit of craft glue around the rim of your base, center it on the lid, and let dry. Once it’s dry you can flip it right side up and start decorating!
These are on my kitchen hutch with my gingerbread tree. Don’t they look great!
This is by far my favorite time of the year. I love when the time changes and the nights get longer, the weather gets cooler, and you can find pumpkin flavor in just about everything!
So, I have to share this story with you guys. I’m starting to decorate my home for Halloween and I’m not too impressed with my wreath for my front door. It was something I just threw together when I was younger and I’ve had it for years. I never got around to updating it.
The Dimestore Gypsy
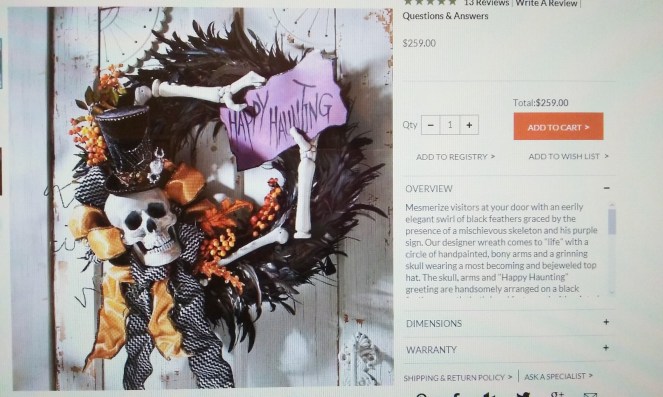
It’s not too bad but I had my heart set on a wreath I came across last year on Pinterest.
After seeing my little plain one, I thought, “I’m just going to buy the one I really want and be done with it”.
grandinroad.com
So here it is and OMG!! I about had a heart attack! While it is gorgeous, I can’t even imagine spending that much on a wreath. I was kind of bummed because I just fell in love with this one. I’m all about creating something fab, so I set out on a mission to find supplies to make my own and as low-cost as possible.
I was at Dollar Tree a few days ago looking at their Halloween decor and was super excited to find these plastic skulls and glow in the dark skeleton arms! I got 2 arms and a skull to use for the skeleton.
Next, I found these feathered boas in the kids costume aisle. I bought 3 black, and 2 orange/black to alternate around the wreath like the feathered one.
dollartree.com
They happened to have some Halloween wired ribbon so I got 1 of the orange sheer fall prints, 1 sheer orange/black dot, and I roll of the orange/metallic deco mesh to use as the collar around the skull.
dollartree.com
They also had some cute decorative wooden signs so I picked one that had orange, black, and yellow to match the rest of the wreath for the skeleton to “hold”.
dollartree.com
I was so excited and came straight home and got started. It was a labor of love and so rewarding to see the finished product. I only spent $13 dollars on supplies to makeover the one I already had. If you wanted to make one and you don’t have a wreath, you can get one at any craft store. I used the 18″ grapevine wreath from Hobby Lobby (5.99) and used my 40% off coupon. With the wreath and supplies It will put you right under $20.00. Not a bad deal at all!
This slideshow requires JavaScript.
I’m really happy with my new wreath and will enjoy it for years to come. I hope this inspires you to get out and see what you can do. You don’t have to spend a lot to make something fabulous!
Here’s a link to a cute, inexpensive Halloween wreath project from Dollar Tree using their products. Click on the Halloween look book and it will have the supply list and instructions.
Dollar Tree Deco Mesh Wreath DIY
I’d love to see your fabulous projects! Leave a message or comment and I’ll get back to ya. You can find me on Instagram at dimestoregypsygal.